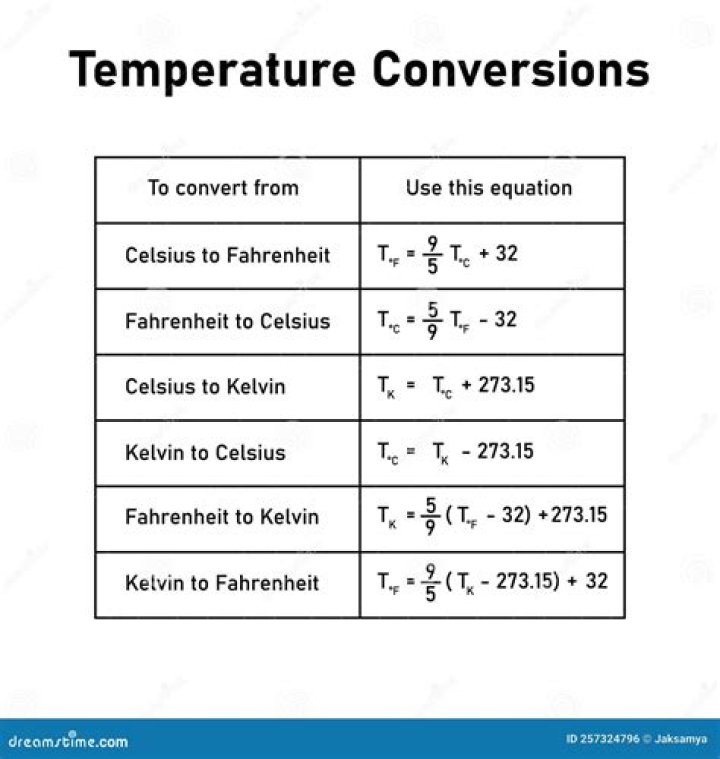
In this Photoshop web design tutorial, we are going to design a smashing, clean, and professional website layout in Photoshop. The layout we are doing in this tutorial can be used as personal or corporate website design.
How do you make slices in Photoshop?
Photoshop Slice Tool
- Select the slice tool in the toolbox.
- Click and drag over the area you wish to make into a slice.
- Release the mouse button – Photoshop automatically creates the necessary number of slices, with the active slice highlighted.
Which tool is used to cut images into slices which can be exported to a Web page?
You export and optimize a sliced image using the Save For Web command. Photoshop saves each slice as a separate file and generates the HTML or CSS code needed to display the sliced image. Web page divided into slices.
What size should I design my website in Photoshop?
Create a large Photoshop document, at least 1200 pixels wide by 900 pixels deep (this can be increased later with Canvas Size), RGB at 72 dpi.
How do I export slices in Photoshop 2020?
Once the image is sliced, Go to export (save for web), then when you save it make sure it is on “save html and images” from the dropdown menu at the bottom. Photoshop with create a folder with your image saved as separate slices.
Where is Slice tool Photoshop?
The slice tool is present in the section of the crop tool in the tool palette in Photoshop. To select slice tool, right-click on the crop tool -> A dialog box will open with other tools including the slice tool -> Select the slice tool from there.
How do I export slices in Illustrator?
Well, normally you would just select all the assets by pressing Control-A and then go to Object > Slice > Make. Then you would go to File > Save for Web, choose PNG as your desired format, set your Export option to Selected Slices and finally hit Save.
How do I save a slice in Photoshop without Save for Web?
Crop the image before saving. Photoshop CS6+’s crop tool (in the toolbar, shortcut C ) allows you to crop an image without actually removing the content you crop away. All you have to do is uncheck the ‘Delete cropped pixels’ box. When you’re done saving (as), select the crop tool again and crop your next slice.
How do I use slices in my website?
Once you create slices, you can turn them into buttons, and then program those buttons to make the web page work. Any new slice you create within an image (a user slice) automatically creates other slices ( auto slices) that cover the entire area of the image outside the user slice.
How do I create a slice based image in Photoshop?
Choose Layer > New Layer Based Slice. In the image window, a slice numbered 04, with a blue badge, appears over the image of the boy. It is numbered according to its position in the slices, starting from the top-left corner of the image. Using the Slice Select tool ( ), double-click the slice, and name it Image 1.
How to slice a banner in Photoshop?
Slice your layout and export images using Photoshop. Select the slice too l and draw a box to define the area you want to slice. We will first create a slice for the logo. Next, use the slice tool again to drag across the banner and create the next slice. Repeat for the graphics found on the right with the dotted line.
How do I Save my sliced images to my website?
Select the 3 sliced images in the save for web pop-up box by using the shift key. Click on Save. A screen named Saved Optimized As will appear. Save your slices in your website folder. Make sure your image file is in the same path as your work file.