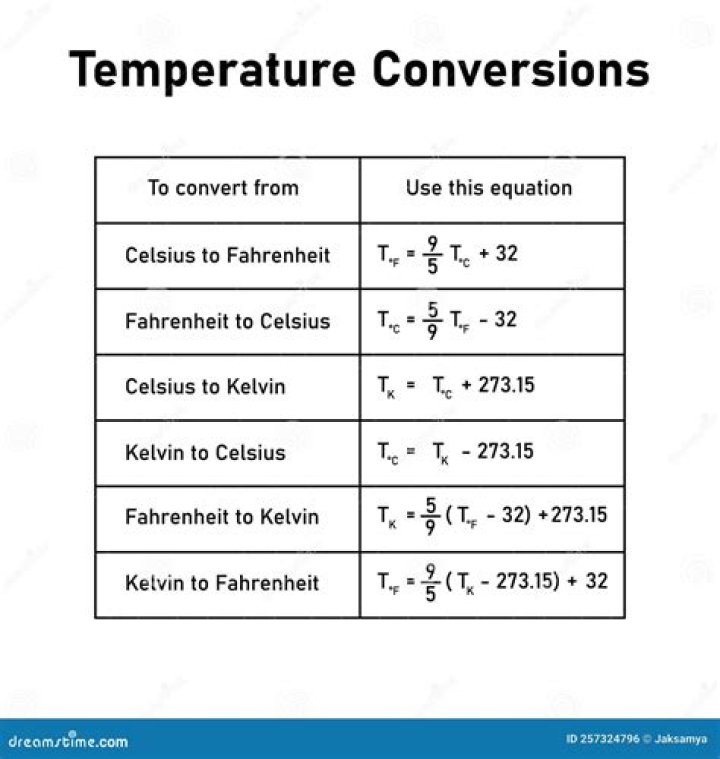
Create the Normal Map
- Open texture in Photoshop as you would normally any image. Make sure the image mode is set to RGB.
- Choose Filter → 3D → Generate Normal Map…
- Adjust your map as necessary (I left my to default). Click OK.
- Save your file as PNG (not sure if it really matters). You’re done!
How do I create a texture map in Photoshop?
How To Map A Texture To A Face With Photoshop
- Step 1: Select The Channel With The Best Image Contrast.
- Step 2: Duplicate The Channel.
- Step 3: Apply The Median Filter To The Displacement Map Image.
- Step 4: Apply The Gaussian Blur Filter.
- Step 5: Convert The Image To Grayscale.
- Step 6: Save The Image As A Photoshop .
How do I create a 3D texture in Photoshop?
Open a 3D file with a poorly mapped diffuse texture, and select the 3D layer containing the model. Choose 3D > Reparameterize. Photoshop notifies you that you are reapplying the texture to the model. Click OK.
Should I use bump map or normal map?
Normal maps can be referred to as a newer, better type of bump map. In the end, a normal map does create the illusion of depth detail on the surface of a model but it does it differently than a bump map. As we already know, a bump map uses grayscale values to provide either up or down information.
Why is bump mapping used?
Bump Maps. Bump maps create the illusion of depth and texture on the surface of a 3D model using computer graphics. Textures are artificially created on the surface of objects using grayscale and simple lighting tricks, rather than having to manually create individual bumps and cracks.
How to create normal and bump maps in Photoshop?
Normal maps are as easy to create in Photoshop as Bump maps. Go to Filter > 3D > Generate Bump Map. The Generate Normal Map dialog box is almost identical to the Generate Bump Map dialog box.
How do I edit my bump map?
After you generate your Bump map, you can edit it with any of photoshop’s regular adjustments, tools, or filters. One common technique is to use the Dodge and Burn tools to adjust the luminosity of certain areas.
Do bump maps change the 3D geometry of the image?
The actual 3D geometry is not changed in any way. The 256 different levels of luminosity in bump maps are used to tell the Photoshop how far to push down or pull down. Bump maps are really easy to create using Photoshop’s 3D filters.
What is the difference between a bump map and normal map?
Unlike a Bump map, Normal maps can be very difficult edit in Photoshop. Each RGB channel is adjusted to present a movement in a single axis in 3D. This means that any adjustments would need to be made the appropriate RGB channel, and not the whole image. Depth maps are 2D images that use their luminance values to create 3D objects.